First steps
Before starting, you need a Seald account. You can create a trial account on our staging environment here: https://www.seald.io/fr/create-sdk.
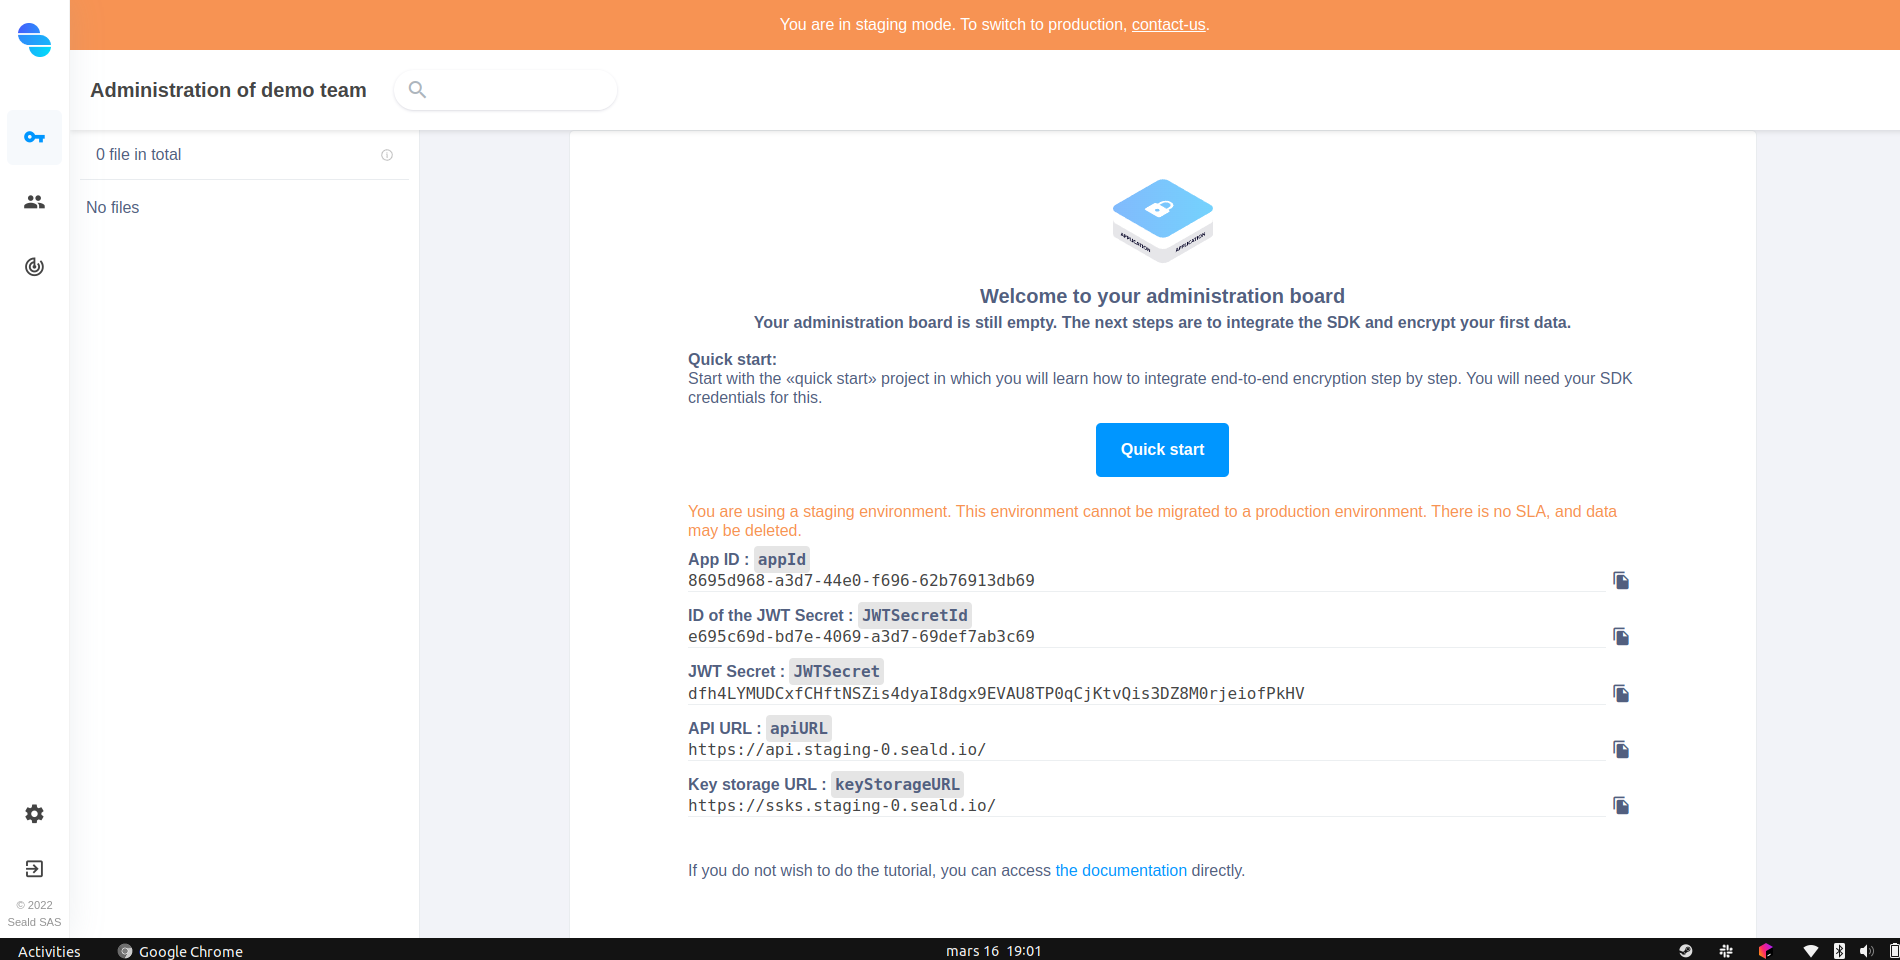
Once your trial account is created, you can access the administration panel and retrieve the necessary information.
WARNING
This allows you to create an account on our test environment only. This environment cannot be migrated to a production environment. There is no SLA, and data may be deleted.
To create a production account, contact us.
Prerequisites
From your developer account, get the following elements:
appId: Unique UUID for your application;apiURL: URL of the API server to use. Required only for test environments; for production environment, you can omit the variable;keyStorageURL: URL of the identity storage server to use. Required only for test environments; for production environment, you can omit the variable;
 |
|---|
| Administration dashboard |
Using the SDK requires JSON Web Tokens (JWT). Generating JWTs requires a JWT Secret.
When creating your administration account, a JWT Secret including all permissions is automatically generated. This is displayed on the dashboard homepage.
WARNING
The JWTSecret is a secret, it should be managed securely. The appId and the JWTSecretId can be public.
You can create other JWT Secrets on the dashboard. To do this, go to the settings, JWT Secrets tab. Click on Create secret. Select the permissions you want, then confirm the creation of the secret. Once the secret is created, get its ID, noted JWTSecretId hereafter, and its value, JWTSecret.
Installation
To use the Seald SDK in your app, you must install the NPM package @seald-io/sdk:
npm i -S @seald-io/sdkReact-Native application
For use with React-Native, in addition to the Seald SDK itself, you will need to install other dependencies and add certain configurations.
For more details, you can refer to our dedicated guide.
Generation of the signupJWT
The signupJWT are generated from the shared secret JWTSecret retrieved above.
Since this is a secret not to be disclosed to the client side, it should be stored on the application server side and used to derive a signupJWT per user on the server side on demand, with a specific API point to be developed in the application server. A dedicated guide is available for this.
You can directly use one of our examples of signup JWT generation.
Storing User identities
To store the user's identity on the local device, you can use a persistent local database.
Additionally, to protect user identities on a server, two modes are available:
- using a password with the plugin
@seald-io/sdk-plugin-ssks-password; - using two-man rule with the plugin
@seald-io/sdk-plugin-ssks-2mr.
These modes are available as separately installable plugins for the Seald SDK:
# For password protection @seald-io/sdk-plugin-ssks-password :
npm i -S @seald-io/sdk-plugin-ssks-password

# For a 2-man rule protection @seald-io/sdk-plugin-ssks-2mr :
npm i -S @seald-io/sdk-plugin-ssks-2mr
For more details, see here.
WARNING
If no identity protection plugin and no persistant database is used, the user's identity will not be stored anywhere, and the data encrypted with it would be unrecoverable as soon as the browser tab or application is closed.
Start encrypting
Once all these elements are taken care of, all that's left to do is to start encrypting 😊.
Import
First, you need to import the SDK, and the desired plugins:
import SealdSDK from '@seald-io/sdk'

import SealdSDKPluginSSKSPassword from '@seald-io/sdk-plugin-ssks-password'
For specific cases (especially in non-standard build processes), see details of import modes.
Instanciation
This step allows to instantiate the SDK.
const seald = SealdSDK({ appId, apiURL })
await seald.initialize()
If you use plugins, you must pass them to the instantiation:
const seald = SealdSDK({ appId, apiURL, plugins: [SealdSDKPluginSSKSPassword(keyStorageURL)] })
await seald.initialize()
Initialization & recovery of a Seald identity
In this example, the password protection mode is used, and the identity encrypted by a derivation of this password is sent to the SaaS instance of SSKS.
// If you are creating an account for the first time
const password = 'SuperSecretPassword' // The user's password. Will be used to encrypt their identity keys
const signupJWT = 'XXXXXXXXXXXXXX' // Calculated by your server
const { sealdId: mySealdId } = await seald.initiateIdentity({ signupJWT }) // Create your Seald identity
await seald.ssksPassword.saveIdentity({ userId: myUserId, password }) // Save the password-encrypted Seald identity on the SSKS server// If you are retrieving a previously created account
const password = 'SuperSecretPassword' // The user's password. Will be used to decrypt their identity keys
const { sealdId: mySealdId } = await seald.ssksPassword.retrieveIdentity({ userId: myUserId, password })Encrypt and decrypt
Two possibilities are provided to encrypt and decrypt:
// Encrypt / decrypt files
const encryptedFile = await seald.encryptFile('Secret file content', { sealdIds: [mySealdId, otherUserSealdId] }, { filename: 'SecretFile.txt' })
const decryptedFile = await seald.decryptFile(encryptedFile)// Use sessions
const session = await seald.createEncryptionSession({ sealdIds: [mySealdId, otherUserSealdId] })
const encryptedMessage = await session.encryptMessage('SecretMessage')
const decryptedMessage = await session.decryptMessage(encryptedMessage)
await session.addRecipients({ sealdIds: [anotherUserSealdId] })
await session.revokeRecipients({ sealdIds: [otherUserSealdId] })
const sessionBis = await seald.retrieveEncryptionSession({ encryptedMessage })
const decryptedMessageBis = await sessionBis.decryptMessage(encryptedMessage)